Integration with Perspective
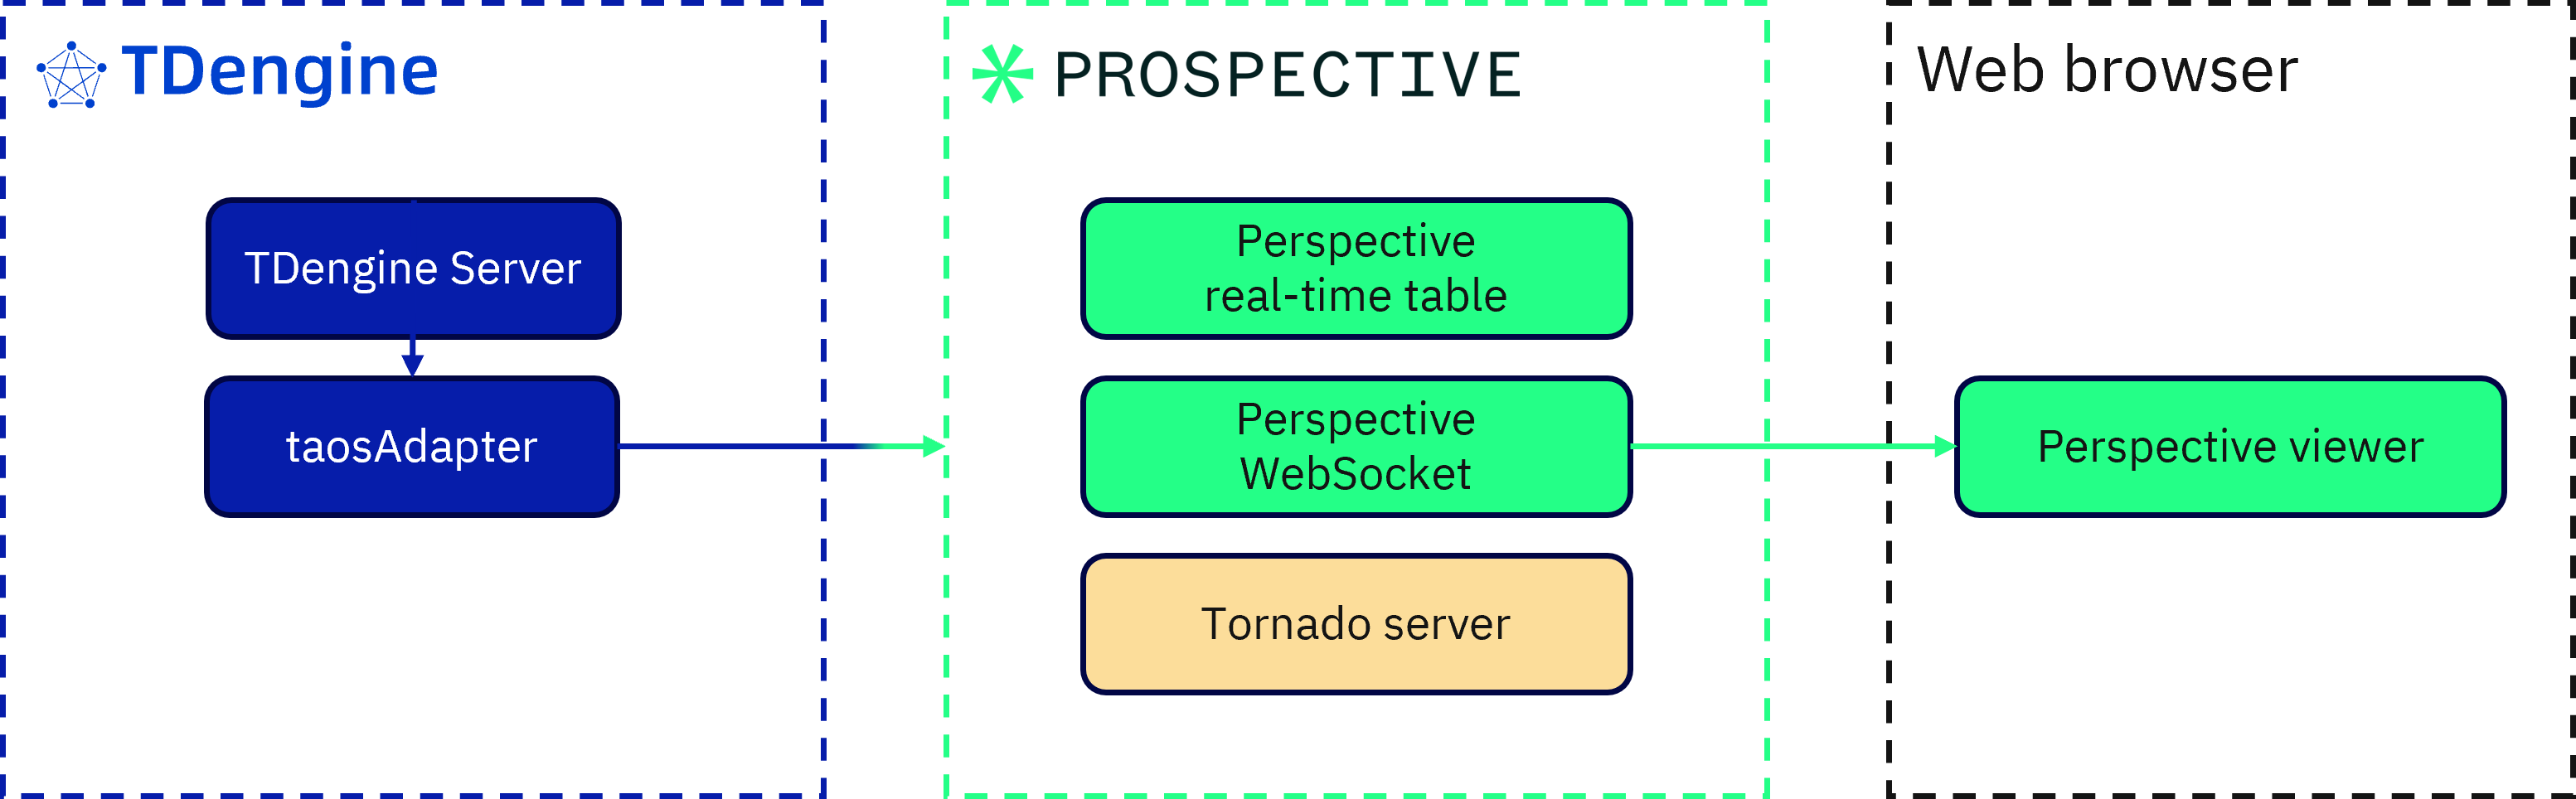
This document demonstrates how to integrate TDengine with Perspective, a powerful data visualization library from Prospective.co. By combining these technologies, you can create a real-time data visualization platform that streams data from TDengine to an interactive real-time Perspective dashboard.
The integration can be performed using the Node.js or Python connector.
Connect to Perspective Using Node.js
Prerequisites
- Ensure that TDengine and taosAdapter are installed and running.
- Install Node.js. For more information, see the official website.
- Install the TDengine Node.js client library. For more information, see Node.js Client Library.
- Install Perspective. For more information, see JavaScript in the Perspective documentation.
Create a Perspective Server
You can write a Perspective WebSocket server in Node.js that retrieves data from TDengine as follows:
-
Import Perspective and the TDengine client library as dependencies:
import perspective from "@finos/perspective";
import * as taos from "@tdengine/websocket"; -
Configure TDengine:
const TAOS_CONNECTION_URL = '<taosadapter-url>';
const TAOS_USER = '<tdengine-username>';
const TAOS_PASSWORD = '<tdengine-password>';
const TAOS_DATABASE = '<tdengine-database>';
const TAOS_TABLENAME = '<tdengine-table>';
Enter the connection URL as a WebSocket URL with the IP address and port of taosAdapter, for example
ws://localhost:6041. -
Configure Perspective:
const PRSP_TABLE_NAME = TAOS_TABLENAME;
const PRSP_TABLE_LIMIT = <perspective-row-limit>;
const PRSP_TABLE_REFRESH_INTERVAL = <perspective-refresh-interval>;
Specify the refresh interval in milliseconds.
-
Connect to your TDengine database:
async function taosCreateConnection(
    url = TAOS_CONNECTION_URL,
    user = TAOS_USER,
    password = TAOS_PASSWORD
) {
    try {
        let conf = new taos.WSConfig(url);
        conf.setUser(user);
        conf.setPwd(password);
        const conn = await taos.sqlConnect(conf);
        console.log(`Connected to ${url} successfully.`);
        return conn;
    } catch (err) {
        console.error(`Failed to connect to ${url}, ErrCode: ${err.code}, ErrMessage: ${err.message}`);
        process.exit(1);
    }
} -
Query your TDengine table and return the timestamp column and one or more metrics as an array of objects. Note that you must convert TDengine's timestamp column to a timestamp in Node.js.
async function taosQuery(conn, databaseName = TAOS_DATABASE, tableName = TAOS_TABLENAME) {
    try {
        const sql = `
            SELECT
                <timestamp-column>, <column2>, <column3>, ...
            FROM ${databaseName}.${tableName}
            ORDER BY <timestamp-column> DESC
            LIMIT ${PRSP_TABLE_LIMIT};
        `;
        const wsRows = await conn.query(sql);
        const data = [];
        while (await wsRows.next()) {
            let row = wsRows.getData();
            data.push({
                <timestamp-column>: new Date(Number(row[0])),
                <column2>: row[1],
                <column3>: row[2],
                ...
            });
        }
        return data;
    } catch (err) {
        console.error(`Failed to query table ${databaseName}.${tableName}, ErrCode: ${err.code}, ErrMessage: ${err.message}`);
        throw err;
    }
} -
Create a Perspective table to host on the WebSocket server:
async function prspCreatePerspectiveTable() {
    // Define the schema for the table.
    const schema = {
        <timestamp-column>: "datetime",
        <column1>: "<data-type>",
        <column2>: "<data-type>",
        ...
    };
    // Create a table with the defined schema and row limit.
    // Other supported formats: "json", "columns", "csv" or "arrow", "ndjson"
    const table = await perspective.table(schema, { name: PRSP_TABLE_NAME, limit: PRSP_TABLE_LIMIT, format: "json" });
    return table;
}
To determine the Node.js data type for each metric, refer to Data Type Mapping.
-
Create the main function to orchestrate the workflow. In this function, you create a TDengine connection, Perspective WebSocket server, and Perspective table. Then you set up a timer to query TDengine periodically and update the Perspective table accordingly.
async function main() {
    // Create a TDengine connection and a Perspective WebSocket server.
    const conn = await taosCreateConnection();
    const ws = new perspective.WebSocketServer({ port: 8080 });

    // Create a Perspective table.
    const table = await prspCreatePerspectiveTable();

    console.log(`Perspective WebSocket server is running on ws://localhost:8080`);

    // Set up a timer to query TDengine periodically and update the Perspective table.
    setInterval(async () => {
        try {
            const data = await taosQuery(conn);
            await table.update(data);
            // console.log(`Perspective table refreshed: ${data.length} rows.`);
        } catch (err) {
            console.error(`Error updating Perspective table: ${err.message}`);
            console.error(`Exiting...`);
            await table.clear();
            await conn.close();
            await taos.destroy();
            process.exit(1);
        }
    }, PRSP_TABLE_REFRESH_INTERVAL);
}
Note that the Perspective WebSocket server is always hosted at
ws://localhost:8080/websocket. -
Run the main function:
main();
Create a Perspective Viewer
An example viewer is shown as follows. Replace the columns and aggregates with those appropriate for your scenario.
Perspective Viewer
<!DOCTYPE html>
<html lang="en">
    <head>
        <meta charset="UTF-8" />
        <meta name="viewport" content="width=device-width, initial-scale=1.0" />

        <link rel="preload" href="https://cdn.jsdelivr.net/npm/@finos/perspective@3.4.3/dist/wasm/perspective-server.wasm" as="fetch" type="application/wasm" crossorigin="anonymous" />
        <link rel="preload" href="https://cdn.jsdelivr.net/npm/@finos/perspective-viewer@3.4.3/dist/wasm/perspective-viewer.wasm" as="fetch" type="application/wasm" crossorigin="anonymous" />
        <link rel="stylesheet" crossorigin="anonymous" href="https://cdn.jsdelivr.net/npm/@finos/perspective-viewer@3.4.3/dist/css/themes.css" />

        <title>TDengine + Perspective</title>

        <style>
            perspective-viewer {
                position: absolute;
                top: 0;
                left: 0;
                right: 0;
                bottom: 0;
            }
        </style>
    </head>
    <body>

        <perspective-viewer id="viewer" theme="Pro Dark"></perspective-viewer>

        <script type="module">
            import "https://cdn.jsdelivr.net/npm/@finos/perspective-viewer@3.4.3/dist/cdn/perspective-viewer.js";
            import "https://cdn.jsdelivr.net/npm/@finos/perspective-viewer-datagrid@3.4.3/dist/cdn/perspective-viewer-datagrid.js";
            import "https://cdn.jsdelivr.net/npm/@finos/perspective-viewer-d3fc@3.4.3/dist/cdn/perspective-viewer-d3fc.js";

            import perspective from "https://cdn.jsdelivr.net/npm/@finos/perspective@3.4.3/dist/cdn/perspective.js";

            // get perspective-viewer element
            const viewer = document.getElementById("viewer");
            // connect to pserpective server websocket and retrieve table
            const tableName = "meters";
            const websocket = await perspective.websocket("ws://localhost:8080/websocket");
            const table = await websocket.open_table(tableName)
            // load the table into perspective-viewer
            viewer.load(table);

            // --- optional configuration ---
            // set the default view configuration
            const viewer_config = {
                version: "3.4.3",
                plugin: "Datagrid",
                plugin_config: {
                    columns: {},
                    edit_mode: "READ_ONLY",
                    scroll_lock: false
                },
                columns_config: {},
                settings: true,
                theme: "Pro Dark",
                title: tableName,
                group_by: [
                    "location"
                ],
                split_by: [],
                columns: [
                    "ts",
                    "current",
                    "voltage",
                    "phase",
                    "location",
                    "groupid"
                ],
                filter: [],
                sort: [],
                expressions: {},
                aggregates: {
                    phase: "last",
                    groupid: "count",
                    voltage: "mean",
                    ts: "last",
                    location: "dominant",
                    current: "mean"
                }
            };
            viewer.restore(viewer_config);
        </script>

    </body>
</html>
You can now host this HTML file on a web server and use Perspective's visualization tools with your data from TDengine. For more information, see <perspective-viewer> Custom Element library.
Node.js Demo
This section creates a quick demonstration environment using Node.js with which you can explore TDengine and Perspective.
Prerequisites
- Install Git. For more information, see the official website.
- Install Docker. For more information, see the official website.
Procedure
-
Clone the
perspective-examplesrepository from GitHub to your local machine and open theexamples/tdengine/nodedirectory.git clone https://github.com/ProspectiveCo/perspective-examples
cd examples/tdengine/node -
Run the provided script to start TDengine in a Docker container:
./docker.sh -
Install Node.js dependencies:
npm install -
Run the producer script to create a database and table in TDengine and insert simulated data in real time:
node src/producer.js -
Run the server script to construct a Perspective WebSocket server and a Perspective table:
node src/server.js -
Host the Perspective front-end with Vite.
npm run dev -
Open the URL of the Vite development server in a web browser. The default URL is
http://localhost:3000.
Connect to Perspective Using Python
Prerequisites
- Ensure that TDengine and taosAdapter are installed and running.
- Install Python 3.10 or later. For more information, see the official website.
- Install the TDengine Python client library. For more information, see Python Client Library.
- Install Perspective. For more information, see Python in the Perspective documentation.
Create a Perspective Server
You can write a Perspective server in Python that retrieves data from TDengine as follows:
-
Import the TDengine client library as a dependency:
import taosws -
Configure TDengine:
TAOS_HOST = "<taosadapter-hostname>"
TAOS_PORT = <taosadapter-port-number>
TAOS_USER = "<tdengine-username>"
TAOS_PASSWORD = "<tdengine-password>" -
Connect to your TDengine instance:
conn = taosws.connect(host=TAOS_HOST, port=TAOS_PORT, user=TAOS_USER, password=TAOS_PASSWORD) -
Query a TDengine table to retrieve the timestamp column and one or more metrics.
def read_tdengine(conn):
    sql = """
        SELECT <timestamp-column>, <column1>, <column2>, ...
        FROM <table-name>
        WHERE <timestamp-column> >= NOW() - 1s
        ORDER BY <timestamp-column> DESC
        LIMIT 1000
    """
    res = conn.query(sql)
    data = [
        {
            "<timestamp-column>": convert_ts(row[0]),
            "<column1>": row[1],
            "<column2>": row[2],
            ...
        }
        for row in res
    ]
return data -
Create a Perspective table and update it with data from TDengine:
def perspective_thread(perspective_server, tdengine_conn):
    client = perspective_server.new_local_client()
    schema = {
        "<timestamp-column>": datetime,
        "<column1>": <data-type>,
        "<column2>": <data-type>,
        ...
    }
    table = client.table(schema, limit=1000, name="<table-name>")

    def updater():
        data = read_tdengine(tdengine_conn)
        table.update(data)

    callback = tornado.ioloop.PeriodicCallback(callback=updater, callback_time=250)
    callback.start()
To determine the Python data type for each metric, refer to Data Type Mapping.
-
Set up a Tornado application with a WebSocket handler to serve the Perspective table:
def make_app(perspective_server):
    return tornado.web.Application([
        (
            r"/websocket",
            perspective.handlers.tornado.PerspectiveTornadoHandler,
            {"perspective_server": perspective_server},
        ),
]) -
Create the main function to orchestrate the workflow. In this function, you initialize the Perspective server, connect to TDengine, and start the Tornado IOLoop:
if __name__ == "__main__":
    perspective_server = perspective.Server()
    tdengine_conn = create_tdengine_connection()
    app = make_app(perspective_server)
    app.listen(8080, address='0.0.0.0')

    loop = tornado.ioloop.IOLoop.current()
    loop.call_later(0, perspective_thread, perspective_server, tdengine_conn)
    loop.start()
Create a Perspective Viewer
An example viewer is shown as follows. Replace the columns and aggregates with those appropriate for your scenario.
Perspective Viewer
<!DOCTYPE html>
<html lang="en">
    <head>
        <meta charset="UTF-8" />
        <meta name="viewport" content="width=device-width, initial-scale=1.0" />

        <link rel="preload" href="https://cdn.jsdelivr.net/npm/@finos/perspective@3.4.3/dist/wasm/perspective-server.wasm" as="fetch" type="application/wasm" crossorigin="anonymous" />
        <link rel="preload" href="https://cdn.jsdelivr.net/npm/@finos/perspective-viewer@3.4.3/dist/wasm/perspective-viewer.wasm" as="fetch" type="application/wasm" crossorigin="anonymous" />
        <link rel="stylesheet" crossorigin="anonymous" href="https://cdn.jsdelivr.net/npm/@finos/perspective-viewer@3.4.3/dist/css/themes.css" />

        <title>TDengine + Perspective</title>

        <style>
            perspective-viewer {
                position: absolute;
                top: 0;
                left: 0;
                right: 0;
                bottom: 0;
            }
        </style>
    </head>
    <body>

        <perspective-viewer id="viewer" theme="Pro Dark"></perspective-viewer>

        <script type="module">
            import "https://cdn.jsdelivr.net/npm/@finos/perspective-viewer@3.4.3/dist/cdn/perspective-viewer.js";
            import "https://cdn.jsdelivr.net/npm/@finos/perspective-viewer-datagrid@3.4.3/dist/cdn/perspective-viewer-datagrid.js";
            import "https://cdn.jsdelivr.net/npm/@finos/perspective-viewer-d3fc@3.4.3/dist/cdn/perspective-viewer-d3fc.js";

            import perspective from "https://cdn.jsdelivr.net/npm/@finos/perspective@3.4.3/dist/cdn/perspective.js";

            // get perspective-viewer element
            const viewer = document.getElementById("viewer");
            // connect to pserpective server websocket and retrieve table
            const tableName = "meters";
            const websocket = await perspective.websocket("ws://localhost:8080/websocket");
            const table = await websocket.open_table(tableName)
            // load the table into perspective-viewer
            viewer.load(table);

            // --- optional configuration ---
            // set the default view configuration
            const viewer_config = {
                version: "3.4.3",
                plugin: "Datagrid",
                plugin_config: {
                    columns: {},
                    edit_mode: "READ_ONLY",
                    scroll_lock: false
                },
                columns_config: {},
                settings: true,
                theme: "Pro Dark",
                title: tableName,
                group_by: [
                    "location"
                ],
                split_by: [],
                columns: [
                    "ts",
                    "current",
                    "voltage",
                    "phase",
                    "location",
                    "groupid"
                ],
                filter: [],
                sort: [],
                expressions: {},
                aggregates: {
                    phase: "last",
                    groupid: "count",
                    voltage: "mean",
                    ts: "last",
                    location: "dominant",
                    current: "mean"
                }
            };
            viewer.restore(viewer_config);
        </script>

    </body>
</html>
You can now host this HTML file on a web server and use Perspective's visualization tools with your data from TDengine. For more information, see <perspective-viewer> Custom Element library.
Python Demo
This section creates a quick demonstration environment using Node.js with which you can explore TDengine and Perspective.
Prerequisites
- Install Git. For more information, see the official website.
- Install Docker. For more information, see the official website.
Procedure
-
Clone the
perspective-examplesrepository from GitHub to your local machine and open theexamples/tdengine/pythondirectory.git clone https://github.com/ProspectiveCo/perspective-examples
cd examples/tdengine/python -
Run the installation script to install the TDengine client to your local machine:
./install.sh-
Run the following command to verify whether a symlink for
libtaos.sohas been created:ls -l tdengine-client/driver/ -
Run the following command to verify whether the environment variable for the client library directory has been created:
echo $LD_LIBRARY_PATHIf the variable has not been set, run the following command:
export LD_LIBRARY_PATH="$LD_LIBRARY_PATH:<path>/tdengine-client/driver"
-
-
Run the provided script to start TDengine in a Docker container:
./docker.sh -
Run the producer script to create a database and table in TDengine and insert simulated data in real time:
python producer.py -
Run the server script to construct a Perspective WebSocket server and a Perspective table:
python perspective_server.py -
Open the
prsp-viewer.htmlfile in your browser to view the Perspective table.open prsp-viewer.html