Apache Kafka
The features or components discussed in this document are available in TDengine TSDB-Enterprise only. TDengine TSDB-OSS does not include these features or components.
This section describes how to create data migration tasks through the taosExplorer interface, migrating data from Kafka to the current TDengine cluster.
Feature Overview
Apache Kafka is an open-source distributed streaming system used for stream processing, real-time data pipelines, and large-scale data integration.
TDengine can efficiently read data from Kafka and write it into TDengine, enabling historical data migration or real-time data streaming.
Procedure
Add a Data Source
- In a web browser, open taosExplorer. This interface is located on port 6060 on the hostname or IP address running TDengine.
- In the main menu on the left, click Data In and then click Add Task.
- In the Name field, enter a unique name for the data ingestion task.
- From the Type drop-down list, select Kafka.
- (Optional) If this data ingestion task requires an agent, select the agent from the Agent drop-down list. You can also click Create New Agent to create the agent now.
For more information, see Install taosX-Agent.
- From the Target DB drop-down list, select the database in which you want to store data ingested by this task. You can also click Create Database to create the database now.
Configure Connection Information
bootstrap-server, for example: 192.168.1.92.
Service Port, for example: 9092.
When there are multiple broker addresses, add a +Add Broker button at the bottom right of the connection settings to add bootstrap-server and service port pairs.

Configure SASL Authentication Mechanism
If the server has enabled SASL authentication, you need to enable SASL here and configure the relevant content. Currently, three authentication mechanisms are supported: PLAIN/SCRAM-SHA-256/GSSAPI. Please choose according to the actual situation.
PLAIN Authentication
Select the PLAIN authentication mechanism and enter the username and password:

SCRAM (SCRAM-SHA-256) Authentication
Select the SCRAM-SHA-256 authentication mechanism and enter the username and password:

GSSAPI Authentication
Select GSSAPI, which will use the RDkafka client to invoke the GSSAPI applying Kerberos authentication mechanism:

The required information includes:
- Kerberos service name, usually
kafka; - Kerberos authentication principal, i.e., the authentication username, such as
kafkaclient; - Kerberos initialization command (optional, generally not required);
- Kerberos keytab, you need to provide and upload the file;
All the above information must be provided by the Kafka service manager.
In addition, the Kerberos authentication service needs to be configured on the server. Use apt install krb5-user on Ubuntu; on CentOS, use yum install krb5-workstation.
After configuration, you can use the kcat tool to verify Kafka topic consumption:
kcat <topic> \
  -b <kafka-server:port> \
  -G kcat \
  -X security.protocol=SASL_PLAINTEXT \
  -X sasl.mechanism=GSSAPI \
  -X sasl.kerberos.keytab=</path/to/kafkaclient.keytab> \
  -X sasl.kerberos.principal=<kafkaclient> \
  -X sasl.kerberos.service.name=kafka
If an error occurs: "Server xxxx not found in kerberos database", you need to configure the domain name corresponding to the Kafka node and configure reverse DNS resolution rdns = true in the Kerberos client configuration file /etc/krb5.conf.
Configure SSL Certificate
If the server has enabled SSL encryption authentication, SSL needs to be enabled here and related content configured.
Configure Collection Information
Fill in the configuration parameters related to the collection task in the Collection Configuration area.
Enter the timeout duration in Timeout. If no data is consumed from Kafka, and the timeout is exceeded, the data collection task will exit. The default value is 0 ms. When the timeout is set to 0, it will wait indefinitely until data becomes available or an error occurs.
Enter the Topic name to be consumed in Topic. Multiple Topics can be configured, separated by commas. For example: tp1,tp2.
Enter the client identifier in Client ID. After entering, a client ID with the prefix taosx will be generated (for example, if the identifier entered is foo, the generated client ID will be taosxfoo). If the switch at the end is turned on, the current task's task ID will be concatenated after taosx and before the entered identifier (the generated client ID will look like taosx100foo). Note that when using multiple taosX subscriptions for the same Topic to achieve load balancing, a consistent client ID must be entered to achieve the balancing effect.
Enter the consumer group identifier in Consumer Group ID. After entering, a consumer group ID with the prefix taosx will be generated (for example, if the identifier entered is foo, the generated consumer group ID will be taosxfoo). If the switch at the end is turned on, the current task's task ID will be concatenated after taosx and before the entered identifier (the generated consumer group ID will look like taosx100foo).
In the Offset dropdown, select from which Offset to start consuming data. There are three options: Earliest, Latest, ByTime(ms). The default is Earliest.
- Earliest: Requests the earliest offset.
- Latest: Requests the latest offset.
- ByTime(ms): Starts consuming from a specified timestamp, where the value is a Unix timestamp in milliseconds.
Set the maximum duration to wait for insufficient data when fetching messages in Maximum Duration to Fetch Data (in milliseconds), the default value is 100ms.
In Character Encoding, configure the encoding format of the message body. After receiving a message, taosX uses the specified encoding format to decode the message body to obtain the raw data. Options: UTF_8, GBK, GB18030, BIG5. Default is UTF_8.
Click the Connectivity Check button to check if the data source is available.
Configure Payload Parsing
Fill in the configuration parameters related to Payload parsing in the Payload Parsing area.
Kafka supports multiple parsing rule blocks for different payload structures. Each block has a match expression that uses the same syntax as a filter. The default expression is true, which matches every message. Extraction, splitting, filtering, and mapping rules work the same way inside each block. You can add or delete rule blocks, subject to the table-column limit.
Parsing
There are three methods to obtain sample data:
Click the Retrieve from Server button to get sample data from Kafka.
Click the File Upload button to upload a CSV file and obtain sample data.
Enter sample data from the Kafka message body in Message Body.
JSON data supports JSONObject or JSONArray, and the following data can be parsed using a JSON parser:
{"id": 1, "message": "hello-word"}
{"id": 2, "message": "hello-word"}
or
[{"id": 1, "message": "hello-word"},{"id": 2, "message": "hello-word"}]
The parsing results are shown as follows:
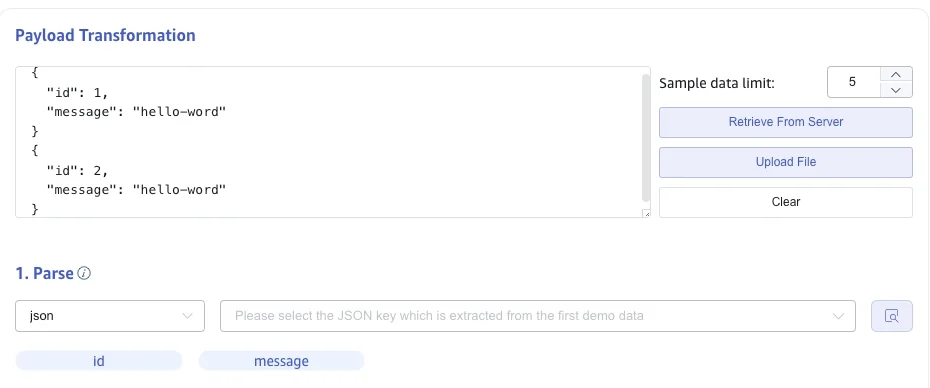
Click the magnifying glass icon to view the preview parsing results.

Field Splitting
In Extract or Split from Columns, fill in the fields to extract or split from the message body, for example: split the message field into message_0 and message_1, select the split extractor, fill in the separator as -, and number as 2.
Click Add to add more extraction rules.
Click Delete to delete the current extraction rule.

Click the magnifying glass icon to view the preview extraction/splitting results.

Data Filtering
In Filter, fill in the filtering conditions, for example: enter id != 1, then only data with id not equal to 1 will be written to TDengine.
Click Add to add more filtering rules.
Click Delete to delete the current filtering rule.
Click the magnifying glass icon to view the preview filtering results.
Table Mapping
In the Target Supertable dropdown, select a target supertable, or click the Create Supertable button on the right.
In the Mapping section, fill in the name of the subtable in the target supertable, for example: t_{id}. Fill in the mapping rules as required, where mapping supports setting default values.
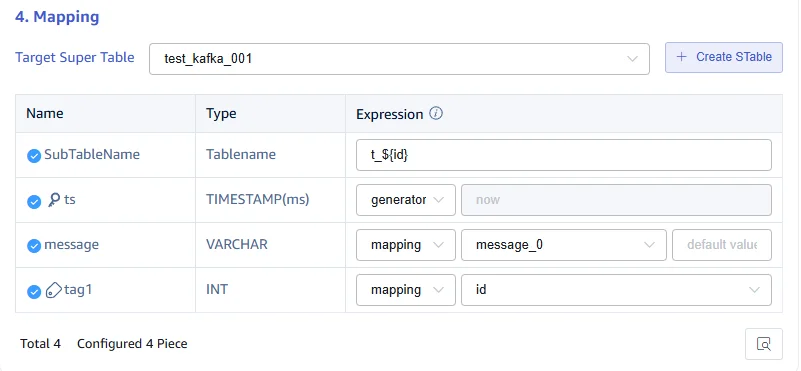
Click Preview to view the results of the mapping.

Configure Advanced Options
The Advanced Options section is collapsed by default. Click > to expand it. Message-queue data sources such as Kafka and Pulsar commonly provide the following options.
Maximum Read Concurrency limits the number of source connections or reader threads. The default 0 lets the connector configure this automatically.
Batch Size specifies the maximum number of messages or rows sent at a time. A common default is 1000.
Write Concurrency specifies how many tasks can write to TDengine concurrently.
For health-monitoring options, see Health Status.
Configure Exception Handling
The Exception Handling Strategy section is collapsed by default. Click > to expand it.
The common strategies are:
- Archive: Write the invalid data to an archive file, by default under
${data_dir}/tasks/<id>/<datetime>, without writing it to the target database. Archive files are used for troubleshooting: only the first batch is kept for each failure reason in the same archive file, and the total number of invalid rows is reported by the task monitoring metrics. Use thetaosx archivecommand to inspect archive files. - Discard: Ignore the invalid data.
- Error: Report an error.
- Cache: For a target connection failure or resource shortage, write data to a cache file and ingest it after the target recovers.
You can configure strategies for these conditions:
- Target connection timeout: Archive, discard, error, or cache.
- Target database does not exist: Archive, discard, or error.
- Table does not exist: Archive, discard, error, or create the table automatically and retry.
- Primary timestamp out of range (
now - keep1throughnow + 100y): Archive, discard, or error. - Primary timestamp is null: Archive, discard, error, or use the current time.
- Composite primary key is null: Archive, discard, or error.
- Table name exceeds 192 characters: Archive, discard, error, truncate, or truncate and archive.
- Invalid table-name characters, such as
.: Archive, discard, error, or replace invalid characters with a configured string. - Null table-name template variable: Discard, leave the variable empty, or replace it with a configured string.
- Column does not exist: Archive, discard, error, or add the missing column automatically and retry.
- Column name exceeds 64 characters: Archive, discard, or error.
- Column value exceeds its defined length: Archive, discard, error, truncate, or truncate and archive. Automatic Column Expansion can alter the table and retry instead.
- Other data errors: Archive, discard, or error.
Additional settings include:
- Connection Timeout: Target connection timeout in seconds, from
1through600. - Temporary Storage Location: A path relative to
${data_dir}/tasks/<id>/. - Archive Retention Days: A nonnegative integer;
0means unlimited. - Archive Available Space: From
0through65535;0means unlimited. - Archive Location: A path relative to
${data_dir}/tasks/<id>/. - Archive Write Failure Strategy: Delete old files, discard the data, or report an error and stop the task.
Completion of Creation
Click the Submit button to complete the creation of the Kafka to TDengine data synchronization task. Return to the Data Source List page to view the status of the task execution.